Showing posts with label to. Show all posts

Tuesday, June 10, 2014

How To Install Official XXLQ2 ICS 4 0 3 Firmware On Galaxy Note

It is a Good news for Galaxy Note users in the Ireland and United Kingdoms. Because The official Ice Cream Sandwich (usually known as ICS) Android 4.0 release update for firmware version XXLQ2 for the two country that i have mentioned. And This update is rolling out over the air or usually called OTA(What is OTA?). Ice Cream Sandwich for the Galaxy Note give a premium suite of applications specifically designed for use with the S-Pen, along with general Android 4.0 updates like faster performance, Face Unlock, improved data usage management, and more. And this Firmware version if one of the stable version of ICS for Gal;axy note for now. there is a boot loader free update, you can apply this update from your galaxy note N700 phone.

install ice cream sandwich firmware xxlq2 on galaxy note

IMPORTANT

Installing this firmware doesnt make your galaxy note N700 automatically rooted. so if you want to get super user or all acces to your phone, you must root it by your self. And for tutorial root i will share on this tutorial for android blog in another day. and if before you install with this firmware you already root it, your root acces will be revoked and you will get your warranty back.

And now before you start install your galaxy note with official XXLQ2 firmware you must prepare this following requirements.

  • before you flash your galaxy note backup all your important data on phone, such as : sms, contacts, etc using your favorite backup apps, to back up your APN and MMS Settings – Note down from the path “Applications > Settings > Wireless and Network > Mobile Networks > Access Point Names”.
  • Then you must enable your USB debugging mode from “Settings > Applications > Development > USB debugging”. and please look at your battery state, your battery state should be at least 60%. this to make sure your phone doesn’t get turned Off in the middle of firmware update process.
After you have successfully update your galaxy note you can root it follow tutorial root galaxy note on android 4.0.3 ics

and dont forget to Disable all the security firewall tools and antivirus that running in your computer and phone as these tools maybe will interrupt the process of your firmware update.

Have you prepare all the requirements above? if you have do it, now we will go ahead to the tutorial

How to Install Ice Cream Sandwich 4.0.3 Firmware XXLQ2 on Galaxy Note


  1. download XXLQ2 Firmware packge and download latest ODIN
  2. Open Odin on your PC/laptop.
  3. turn off your device, so that your galaxy note can enter to the the download mode.
  4. by pressing Volume Down + OK button, and holding both simultaneously press the Power Button. then a Warning message will be appear when you need to press Volume Up key to continue enter to the the Download Mode.
  5. Connect your device to computer via USB data cable. After connecting, the ID : COM square in odin will turn Yellow. it means that all the drivers have been successfully installed.

    Note: If the ID : COM parts doesn’t turn Yellow, you need to check with two things that i mentioned below,• First Install the USB Drivers in your PC/laptop • Go to the “Settings > Wireless & Network > USB Settings” and ensure that “Samsung KIES” option is checked before connecting the phone to the computer.
  6. Click on “PDA” then select “N7000XXLQ2_N7000XXLPT_N7000XEULP4_HOME.tar.md5” that the file that you have download in step 1.
  7. After you have selected the file, click “Start” to start the process of firmware update.
  8. After the update is finished, yor galaxy note will be restarted.
  9. Then Disconnect your device and turn off your Note so that it can be entered in the Recovery Mode. by pressing Volume Down Key + OK button, and holding both simultaneously press the Power Button. Then a Warning message will appear then you must to press the Volume Down key to continue enter to the Recovery Mode.
  10. In recovery mode, select Wipe data/factory reset and also you need to select Wipe Cache partition, after you di that, reboot your device by selecting reboot system now with the help of Volume rocker keys.


Finish. you have successfully install android ice cream sandwich firmware XXLQ2 in galaxy note. please comment if you face any issues or need more help.
Read More..

Monday, June 9, 2014

How To Easily Install Whatsapp Messenger On Android

Who are here are android user? And search How to Install WhatsApp on Android? you are in the right place. Well, this is one messenger apps is so cool. That is why this time i will discuss about this messenger application. Besides can be used on Android, Whatsapp can also be used on other OS tablets. What is it? Whatsapp messenger can be used on Android OS, iPhone, Windows Mobile, Nokia, and Blackberry.

Before we discuss how to install Whatsapp, you maybe still consider, What is Whatsapp? WhatsApp is messenger application that is similar in basic smartphone with BlackBerry Messenger. WhatsApp Messenger is a cross-platform messaging application that allows us to exchange messages without paying for SMS, because WhatsApp Messenger uses the same internet data plan for email, web browsing, and others. So do not use cost to stay in touch.

Application WhatsApp Messenger is sending messages using a 3G or WiFi connection to communicate without the cost. By using WhatsApp, we can chat, file sharing, etc. is essentially very similar as the name of fuel. Well now already know exactly what it Whatsapp.

Since we had already discussed what it Whatsapp Messenger, now its our turn to learn how to install WhatsApp Messenger on Android. Incidentally My Gadget is Galaxy S3 and i use this WhatsApp on it. Okay please see the tutorial and the photos.

How To Easily Install Whatsapp Messenger On Android


  1. First we need to find this application in the Market or now better known as Google PLAY.
    Download And Install Whatsapp DOWNLOAD WhatsApp
    just click the install, and will appear as shown below.
    Easy Way Install Messenger Whatsapp In Android
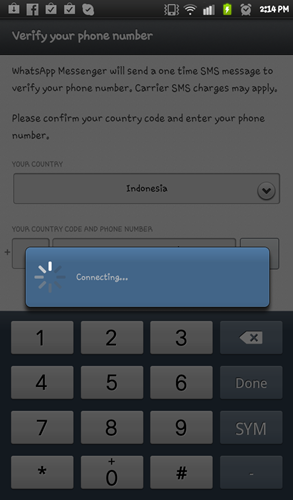
  2. Then it will appear like this picture. Well now its time to fill in your phone number, then press OK.
    Whatsapp In Android
  3. After that it will wait for a while then it will display a notification to confirm whether the number is true. Then press OK to continue to the next stage.phone number confirmationInstall Whatsapp Messenger In Android
  4. Then just wait, because they will send SMS Verification. It did not take long really.how to install whatsapp
  5. If youve confirmed that we have to fill the display name and display picture for our profile.
    download whatsapp for android
  6. Well, then you will see Whatsapp Messenger icon on the DESKTOP HOME or display, click the icon to start Whatsapp Messenger.
  7. Because it is still early so there is no chat we did, well now we will learn how to use WhatsApp Messenger. Then click on the small icon like the big icon, located at the top right corner near the pencil icon.
  8. Okay, well that my friends on our android contacts both using Whatsapp messenger. Please click to chat and congratulations.


Well how guys? it is So easy to operate WhatsApp Messenger android right? Hopefully this article on How To Install Whatsapp Messenger On Android can be useful. Thank you for visiting and see you guys.
Read More..

Friday, June 6, 2014

How To Improve LG Nexus 4 Camera Quality

Although not officially in Italy, the Google LG Nexus 4 does talk a lot about itself even as far as for the modding development. It certainly wont have the same camera of his brother LG Optimus G, but having a Nexus 4 is very likely that we could do something to improve the quality of video recording. So at this post i will share some a good tips for improve Google Nexus 4 Camera.
It has recently been found a xml file that would increase the video framerate, which will make the records more fluid but heavier at the same time for what will be its size in memory. However, to modify this file you must have root permissions. So before we start the modding process if you havent root your nexus you can read my post about how to root nexus 4

how to improve lg nexus 4 camera

In addition to this frame rate settings, you can also change other settings such as frame size, quality, number of audio channels, etc.

How To Improve Photo Quality On Nexus 4

Heres how you can perform this modding to improve your nexus 4 camera quality:

  1. Download an app to browse files (like root explorer or es file explorer, that file is free) you can download it from google play.
  2. Head in the /system/etc folder;
  3. Make sure the directory is mounted as writable (RW);
  4. Look for the media_profiles.xml file and open it with a text-file editor (es file explorer has one built-in);
  5. Once opened, you should find yourself with this text:
    quality EncoderProfile < = "1080p" fileFormat = "mp4" duration = "30" >
    < Video codec = "h264" bitRate = 12000000 " width = "1920" height = "1080" frameRate = "30"/>< Audio codec = "aac" bitRate = "96000" sampleRate = "48000" channels = "1"/>
  6. Change the bitRate from 12000000 to 20000000 (2 followed by 7 zeroes);
  7. Save and reboot.
  8. With this, you should have a 20 Mbit encoding which is definitely better than one of 12Mbit.


If you do not want to take part in this operation, there is however an application should perform a similar work, which you can download it directly from google play.
Download lg camera app if you want you can save it to apk file : how to download apk from google play

Ok thats for the modding tutorial for improve the camera and video quality on lg nexus 4. I hope this can be useful for your daily need.
Read More..

Thursday, June 5, 2014

How To Set Camera Panorama Mode On Samsung Galaxy S3

Hello everyone, today i will present to you a small guide on how to start a panorama mode function in the camera of Galaxy S 3.
As you know, the Samsung Galaxy S3 device has a good performing camera and effects and settings that make it up are really many. You can manually change many settings shutter, so as to resemble this camera a real SLR, but well just like setting the Panorama mode to make unique shots at 180°.
how to set campera panorama on galaxy s3
Before we start i will give some review of the excess of Galaxy S3 Camera
Buddy photoshare-simple photo sharing and various images with your friends using the face recognition. For example, the phone suggests who to send, among our contacts in the phonebook, the photos via email or MMS.
Camera "Zero Shutter Lag" the camera starts up in 990 milliseconds and snaps photos instantly, as soon as you press the shutter button. Record-breaking performance: up to 3.3 pictures per second.


Requirements
  • Prepare your Samsung Galaxy Galaxy S3.
  • Have your camera free of encumbrances.
  • A subject , so you can take the picture of the subject.


Set Camera Panorama Mode On Galaxy S3
  1. First take your Galaxy S III and sbloccatene the screen.
  2. Now go on the camera and put the phone horizontally to achieve a wider and better photography from the qualitative point of view.
  3. Click the icon in the lower left hand corner, the gear shaped and scroll through the options until you find the one that says "shutter Mode".
  4. Click and you will open a new menu where you will see various options. Scroll down until you find the one that says "Panorama". It is easily recognizable because it has the icon of a mountain nearby.
  5. Once you find the icon, click on it and you take a picture in Landscape mode.


IMPORTANT: The Panorama mode will remain active on galaxy s3 until the camera will remain open. As soon as the lock, it will return to its default shutter mode and then to make a new picture in Panorama mode, you will need to rerun the entire procedure again.
Read More..
 
Phone News - Powered By Blogger