Wednesday, June 11, 2014

Picture Password Windows 8 Lockscreen for Android

I am not a big fan of Windows 8 the OS might looks very good, but still holds countless construction sites. One thing that I like about the new system, but besides that also The Windows 8 Lockscreen In principle, you are welcomed with a simple image that you have to touch the right places in order to unlock the PC. Extremely minimalist and simple in practice. If you one of people that like this Windows 8 Lockscreen, I have good news for you: Give Thanks to this small app "Picture Password". Picture password is now the same lock screen feature for Android.

This the app is relatively new, to configure this lock screen you must draw first the lock pattern on the actual image . This lcok screen is not much to configure this unfortunately also means that, for example, their own music (still) can not be controlled by the Picture Password lockscreen. Your can unlock a total of lines, circles and / or points exist.


Requirements


  • Root is required for phones with on-screen navigation bar (Galaxy Nexus, Moto Razr M/HD etc.) and for some phones to disable the status bar


Get Picture Password


You can find Picture Password for Android here in Google Play Store . The developer is also a Pro version for EUR 2.68 willing to unlock a few more functions.
Too bad that Google does not come up with this great way of Lockscreens! What do you think of Picture Password for Android?

You also can find anothe lockscreen for android on my post about download best android lockscreen
Read More..

Tuesday, June 10, 2014

Review LG Google Nexus 4 Full with video

Today well give your review about the new masterpiece by Google and LG — the Nexus 4, but today we will have the opportunity to see firsthand how your device behaves.
Thanks to this comprehensive review would see the operation in all circumstances, because as you will see, will be the classic steps that each of us does, using your smartphone on a daily basis.

complete review lg nexus 4


In this video you will also be able to appreciate the aesthetics of the Nexus, which remember has a very special design given the fact that we have both front rear glass.
The peculiarity is linked right in the latter part, it shows a drawing against the light, the quaule is unique and consists of many small panes.
Let us not forget, even the famous technical specifications that make the device a top of the range, because we remember the SoC that the soul is a Snapdragon S4 Pro quad core with a frequency per core equal to 1.5 Ghz.

We also have an excellent multitasking, thanks to RAM that amounts to 2 Gb, allowing you to have a lot of applications in the background and use them at a crazy speed without even a minimal slowdown.

Apparently its been stressed also the battery which allowed a really impressive coming even to touch the threshold of two days, but this is the result of optimization performed by Google, that allows you to have on your smartphone, the latest update of Android — version 4.2.2.
Another peculiarity will find in using the camera application that has a unique feature: Photosphere that will allow us to take pictures at 360 degrees and see in real time a really amazing thing.
As for the videos we have the ability to capture 1080 p frame and below you have an example to figure out how to turn the video device:

Now though just words, we leave you to complete videoreview will clarify all your past doubts and uncertainty about this beautiful and excellent device, enjoy:

Let us know what you think by commenting on the article, but especially if you have questions about we are completely at your disposal.
Read More..

How To Install Official XXLQ2 ICS 4 0 3 Firmware On Galaxy Note

It is a Good news for Galaxy Note users in the Ireland and United Kingdoms. Because The official Ice Cream Sandwich (usually known as ICS) Android 4.0 release update for firmware version XXLQ2 for the two country that i have mentioned. And This update is rolling out over the air or usually called OTA(What is OTA?). Ice Cream Sandwich for the Galaxy Note give a premium suite of applications specifically designed for use with the S-Pen, along with general Android 4.0 updates like faster performance, Face Unlock, improved data usage management, and more. And this Firmware version if one of the stable version of ICS for Gal;axy note for now. there is a boot loader free update, you can apply this update from your galaxy note N700 phone.

install ice cream sandwich firmware xxlq2 on galaxy note

IMPORTANT

Installing this firmware doesnt make your galaxy note N700 automatically rooted. so if you want to get super user or all acces to your phone, you must root it by your self. And for tutorial root i will share on this tutorial for android blog in another day. and if before you install with this firmware you already root it, your root acces will be revoked and you will get your warranty back.

And now before you start install your galaxy note with official XXLQ2 firmware you must prepare this following requirements.

  • before you flash your galaxy note backup all your important data on phone, such as : sms, contacts, etc using your favorite backup apps, to back up your APN and MMS Settings – Note down from the path “Applications > Settings > Wireless and Network > Mobile Networks > Access Point Names”.
  • Then you must enable your USB debugging mode from “Settings > Applications > Development > USB debugging”. and please look at your battery state, your battery state should be at least 60%. this to make sure your phone doesn’t get turned Off in the middle of firmware update process.
After you have successfully update your galaxy note you can root it follow tutorial root galaxy note on android 4.0.3 ics

and dont forget to Disable all the security firewall tools and antivirus that running in your computer and phone as these tools maybe will interrupt the process of your firmware update.

Have you prepare all the requirements above? if you have do it, now we will go ahead to the tutorial

How to Install Ice Cream Sandwich 4.0.3 Firmware XXLQ2 on Galaxy Note


  1. download XXLQ2 Firmware packge and download latest ODIN
  2. Open Odin on your PC/laptop.
  3. turn off your device, so that your galaxy note can enter to the the download mode.
  4. by pressing Volume Down + OK button, and holding both simultaneously press the Power Button. then a Warning message will be appear when you need to press Volume Up key to continue enter to the the Download Mode.
  5. Connect your device to computer via USB data cable. After connecting, the ID : COM square in odin will turn Yellow. it means that all the drivers have been successfully installed.

    Note: If the ID : COM parts doesn’t turn Yellow, you need to check with two things that i mentioned below,• First Install the USB Drivers in your PC/laptop • Go to the “Settings > Wireless & Network > USB Settings” and ensure that “Samsung KIES” option is checked before connecting the phone to the computer.
  6. Click on “PDA” then select “N7000XXLQ2_N7000XXLPT_N7000XEULP4_HOME.tar.md5” that the file that you have download in step 1.
  7. After you have selected the file, click “Start” to start the process of firmware update.
  8. After the update is finished, yor galaxy note will be restarted.
  9. Then Disconnect your device and turn off your Note so that it can be entered in the Recovery Mode. by pressing Volume Down Key + OK button, and holding both simultaneously press the Power Button. Then a Warning message will appear then you must to press the Volume Down key to continue enter to the Recovery Mode.
  10. In recovery mode, select Wipe data/factory reset and also you need to select Wipe Cache partition, after you di that, reboot your device by selecting reboot system now with the help of Volume rocker keys.


Finish. you have successfully install android ice cream sandwich firmware XXLQ2 in galaxy note. please comment if you face any issues or need more help.
Read More..

Monday, June 9, 2014

Download GTA 3 For Android All Device

Hii there, now i want to share game for android, It is GTA ( Grand Theft Auto 3). now you can play this game with your android device, such as Samsung Galaxy Young, galaxy mini, Galaxy Ace, and for android device.
all of you must have ever heard this game, GTA 3 is a famous game that very popular in PC or Console Version.
apk gta 3 download

dowbnload gta 3 for android

downloa apk gta 3


in order to celebrate the 10th anniversary of one of the most influential games of all time, rockstar games like want to give good news for android gamers, especially android smartphone users. because rockstar games made ​​GTA 3 liberty city game for android. This game have been i test in the galaxy mini with a litle slower, but runs perfectly on my xperia live walkman .

Download the apk multiscreen : Download GTA 3 Apk

LINK UPDATED
I have Updated the links, now all work properly, enjoy your games :)


Download data :
Password when extract : tutorialfor-android.blogspot.com
Choose The data based with your device GPU

Game Data:
- RIP Compress , please choose one link to download : Link data 1
(nicely working on ARMv6, x10mini/x8/galaxy mini/ Gio / young) - before extracted 95MB, after extracted 275MB! so this is good data that is used for android who already mentioned above
- i use this for my xperia live walkman : Snapdragon/Adreno
- Galaxy Ace 2 : Mali
- Samsung Galaxy S Plus (i9001) Adreno 205 : Data
- LG Optimus 2X : Tegra
- For HTC Sensation : Data
- For Galaxy Ace (Power VR) : Data
- Arc : Data
Please select the data in the above that fit with your android cpu, if galaxy mini use RIP if LWW use Adreno because its snapdragon


extract data to Sdcard>Android>data


* How to install GTA 3:
1. download apk multiscreen above, then extract
2. extract the data to sdcard gta 3> android> Data
3. install apk gta 3, then play
4. Launch the game & Accept the EULA license
5. Go back to your home screen(by pressing home button) & open the notification panel
6. Click on the running gta3 & Play !!!
7. Enjoy!!!
Read More..

How To Easily Install Whatsapp Messenger On Android

Who are here are android user? And search How to Install WhatsApp on Android? you are in the right place. Well, this is one messenger apps is so cool. That is why this time i will discuss about this messenger application. Besides can be used on Android, Whatsapp can also be used on other OS tablets. What is it? Whatsapp messenger can be used on Android OS, iPhone, Windows Mobile, Nokia, and Blackberry.

Before we discuss how to install Whatsapp, you maybe still consider, What is Whatsapp? WhatsApp is messenger application that is similar in basic smartphone with BlackBerry Messenger. WhatsApp Messenger is a cross-platform messaging application that allows us to exchange messages without paying for SMS, because WhatsApp Messenger uses the same internet data plan for email, web browsing, and others. So do not use cost to stay in touch.

Application WhatsApp Messenger is sending messages using a 3G or WiFi connection to communicate without the cost. By using WhatsApp, we can chat, file sharing, etc. is essentially very similar as the name of fuel. Well now already know exactly what it Whatsapp.

Since we had already discussed what it Whatsapp Messenger, now its our turn to learn how to install WhatsApp Messenger on Android. Incidentally My Gadget is Galaxy S3 and i use this WhatsApp on it. Okay please see the tutorial and the photos.

How To Easily Install Whatsapp Messenger On Android


  1. First we need to find this application in the Market or now better known as Google PLAY.
    Download And Install Whatsapp DOWNLOAD WhatsApp
    just click the install, and will appear as shown below.
    Easy Way Install Messenger Whatsapp In Android
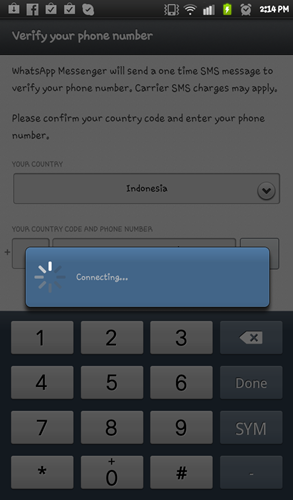
  2. Then it will appear like this picture. Well now its time to fill in your phone number, then press OK.
    Whatsapp In Android
  3. After that it will wait for a while then it will display a notification to confirm whether the number is true. Then press OK to continue to the next stage.phone number confirmationInstall Whatsapp Messenger In Android
  4. Then just wait, because they will send SMS Verification. It did not take long really.how to install whatsapp
  5. If youve confirmed that we have to fill the display name and display picture for our profile.
    download whatsapp for android
  6. Well, then you will see Whatsapp Messenger icon on the DESKTOP HOME or display, click the icon to start Whatsapp Messenger.
  7. Because it is still early so there is no chat we did, well now we will learn how to use WhatsApp Messenger. Then click on the small icon like the big icon, located at the top right corner near the pencil icon.
  8. Okay, well that my friends on our android contacts both using Whatsapp messenger. Please click to chat and congratulations.


Well how guys? it is So easy to operate WhatsApp Messenger android right? Hopefully this article on How To Install Whatsapp Messenger On Android can be useful. Thank you for visiting and see you guys.
Read More..

Sunday, June 8, 2014

Samsung GALAXY S3 XXDLI1 firmware leaked

New another day, new Samsung Galaxy S III Android 4.1.1. Firmware leaked. Today there is again a new fimrware leaked, this is called XXDLI1. I thought so yesterday, the leaked XXDLH4 perhaps is the "final" version of Android 4.1 for the Samsung Galaxy S3, but Samsung surprised me today, in which they release again XXDLI1 firmware version, a new firmware for the Samsung Galaxy S III is already done

Slowly but sure the Android 4.1 firmware versions for the Samsung Galaxy S III like mushrooms. The distances of the appearance of a new firmware are getting shorter, now is perhaps really the Android 4.1 Jelly Bean rollout for the Samsung Galaxy S3 just around the corner? One suspects so still that the update still wants to offer Samsung at IFA 2012th

Well, only minor bugs are eliminated on Android 4.1 Update for Galaxy S III but further enhance on the performance. Because too much change now probably mean nothing now. But the firmware XXDLI1 leaked is already suitable for everyday use. So who is have experience in flashing, can flash this firmware on his Samsung Galaxy S III.


SAMSUNG GALAXY S III - NEW XXDLI1 ANDROID 4.1 FIRMWARE AVAILABLE

galaxy s3 xxdli1 firmware leaked

I think now it can really not in a long time again the Android 4.1 Update will be rolled out for the Samsung Galaxy S III. Yes most of it is, when many firmware leaks occur within a short time, then the "final" version will follow. Lets see the official release of the Samsung Galaxy S3 with Android 4.1.  You can download the XXDLI1 firmware here
Read More..

Saturday, June 7, 2014

Google Sound Search App For Find Titles and singers on android

A few days ago Google released a new application called Google Sound Search, this is an app that no music lover can miss. Sound Search app can recognize all the lyric songs that we do listen to our device, just as like they do already on Shazam, once youve found the song just one click to open Google Play Music and buy the song or the album.

To use the app just place on Widget and youre done: when we hear the song that we want to know the title or the singer just tap the widget and after a few seconds we will have the answer.
what is google sound search


If you remember, this song recognition service was already presented by Google along with Jelly Bean, initially called Google Ears. Unfortunately google Ears has not been integrated into final firmware and remained on Play Store, you can download it free without any charge. Even now with the new name, Sound Search is not yet available in all country, thats why we provide you with the link to the manual installation

download music lyric for android


Download Google Sound Search
Important : you must have the check on "unknown sources" in order to install applications that downloaded apart from the Play Store. Found this item in settings-> Applications in Android 2.2 and 2.3 versions, while in Android 4.0 or higher can be found in settings-> Security.
Read More..

Galaxy Note 2 Gets Multi Window Function Update

The Samsung Galaxy Note 2 since its launch at the IFA 2012 has get some new features, the Samsung also in an official video has been shown for the first time you can see in galaxy note 2 feature video. Who, however, belongs to the first buyers of Samsung Galaxy II, might have wondered about the lack of multi-window function.

galaxy note 2 multi window video

Who was apparently ready for production after delivery, complementing Samsung this function now via an update. The update to version NL100XXALJ1 allows the use of multiple windows, so a kind of picture-in-picture. So if you ever want to play Angry Birds and watch at the same time in another window a YouTube video / wanted to hear music, this possibility can now easily get on the Samsung Galaxy Note 2. I am curious if Samsung will buy this function the first or even the Galaxy Note Samsung Galaxy S III. In the following video can be admired about the function at minute 2:03:

Galaxy Note 2 Multi Window Update
Read More..

Friday, June 6, 2014

How To Improve LG Nexus 4 Camera Quality

Although not officially in Italy, the Google LG Nexus 4 does talk a lot about itself even as far as for the modding development. It certainly wont have the same camera of his brother LG Optimus G, but having a Nexus 4 is very likely that we could do something to improve the quality of video recording. So at this post i will share some a good tips for improve Google Nexus 4 Camera.
It has recently been found a xml file that would increase the video framerate, which will make the records more fluid but heavier at the same time for what will be its size in memory. However, to modify this file you must have root permissions. So before we start the modding process if you havent root your nexus you can read my post about how to root nexus 4

how to improve lg nexus 4 camera

In addition to this frame rate settings, you can also change other settings such as frame size, quality, number of audio channels, etc.

How To Improve Photo Quality On Nexus 4

Heres how you can perform this modding to improve your nexus 4 camera quality:

  1. Download an app to browse files (like root explorer or es file explorer, that file is free) you can download it from google play.
  2. Head in the /system/etc folder;
  3. Make sure the directory is mounted as writable (RW);
  4. Look for the media_profiles.xml file and open it with a text-file editor (es file explorer has one built-in);
  5. Once opened, you should find yourself with this text:
    quality EncoderProfile < = "1080p" fileFormat = "mp4" duration = "30" >
    < Video codec = "h264" bitRate = 12000000 " width = "1920" height = "1080" frameRate = "30"/>< Audio codec = "aac" bitRate = "96000" sampleRate = "48000" channels = "1"/>
  6. Change the bitRate from 12000000 to 20000000 (2 followed by 7 zeroes);
  7. Save and reboot.
  8. With this, you should have a 20 Mbit encoding which is definitely better than one of 12Mbit.


If you do not want to take part in this operation, there is however an application should perform a similar work, which you can download it directly from google play.
Download lg camera app if you want you can save it to apk file : how to download apk from google play

Ok thats for the modding tutorial for improve the camera and video quality on lg nexus 4. I hope this can be useful for your daily need.
Read More..

Tutorial Install Android 4 2 AOSP on Galaxy S I9000

As we know if Samsung has decided to not support update for the first Galaxy S, so i will show you how to install android 4.2 AOSP stable  Galaxy S I9000. Actually the latest official firmware that released by Samsung is a Value Pack android 2.3.6 with some features taken from the Ice Cream Sandwich firmware of the Galaxy S II as the photo editor, the new lockscreen and the "release with a smile."

However, although samsung not support the update again the community from xda developers has and the Cyanogenmod developers have managed to secure the official support Cyanogen Mod Cyanogen 9 and 10 respectively based on Ice Cream Sandwich and Jelly Bean 4.1.

Today, however, we hear directly from XDA, after a port which is a bit need a long time, now available almost fully functional ROM for the first generation Galaxy S based on Android 4.2.

samsung i9000 install android 42

If you are part of this group of users will guide the installation of this Firmware released by pawitp, a member of XDA. Remember well that it is not yet considered stable nor comes from Samsung so you might have serious problems even on the terminal if you do not follow the instructions carefully and obviously did not try it on other devices.

Install Android 4.2 Aosp On GALAXY S I9000

First we proceed to make a backup of important data, the internal SD card will not be touched, so this you should only applications and messages. It will be better to start from a clean official firmware and obtain for root permissions by flashing, always Odin the CF root compatible with your firmware, so in this case use the CF-Root-v4.4-XX_OXA_JW4-CWM3RFS.zip. Now follow these steps:


  1. Download android 4.2 AOSP rom from this url http://adf.ly/FvdcT
  2. Download gapps from this url http://adf.ly/FvdSL
  3. Copy both files to the internal SD and reboot into recovery by pressing Volume Down + Home + Power button;
  4. Going into CWM made ​​before a wipe data and then select install zip from SD card and select the ROM;
  5. If you go with Gingerbread will be able to enter the terminal loop, remove the battery and then restore the boot in recovery leading to reflash the ROM;
  6. After installation flashate the gapps in the same way;
  7. Boot and enjoy!

A lot of opinions in the network are consistent with the fact that the Galaxy S i9000 with Jelly Bean is even faster than with the official Gingerbread firmware Samsung.
Read More..

Thursday, June 5, 2014

How To Set Camera Panorama Mode On Samsung Galaxy S3

Hello everyone, today i will present to you a small guide on how to start a panorama mode function in the camera of Galaxy S 3.
As you know, the Samsung Galaxy S3 device has a good performing camera and effects and settings that make it up are really many. You can manually change many settings shutter, so as to resemble this camera a real SLR, but well just like setting the Panorama mode to make unique shots at 180°.
how to set campera panorama on galaxy s3
Before we start i will give some review of the excess of Galaxy S3 Camera
Buddy photoshare-simple photo sharing and various images with your friends using the face recognition. For example, the phone suggests who to send, among our contacts in the phonebook, the photos via email or MMS.
Camera "Zero Shutter Lag" the camera starts up in 990 milliseconds and snaps photos instantly, as soon as you press the shutter button. Record-breaking performance: up to 3.3 pictures per second.


Requirements
  • Prepare your Samsung Galaxy Galaxy S3.
  • Have your camera free of encumbrances.
  • A subject , so you can take the picture of the subject.


Set Camera Panorama Mode On Galaxy S3
  1. First take your Galaxy S III and sbloccatene the screen.
  2. Now go on the camera and put the phone horizontally to achieve a wider and better photography from the qualitative point of view.
  3. Click the icon in the lower left hand corner, the gear shaped and scroll through the options until you find the one that says "shutter Mode".
  4. Click and you will open a new menu where you will see various options. Scroll down until you find the one that says "Panorama". It is easily recognizable because it has the icon of a mountain nearby.
  5. Once you find the icon, click on it and you take a picture in Landscape mode.


IMPORTANT: The Panorama mode will remain active on galaxy s3 until the camera will remain open. As soon as the lock, it will return to its default shutter mode and then to make a new picture in Panorama mode, you will need to rerun the entire procedure again.
Read More..

Wednesday, June 4, 2014

Tutorial Root Asus Transformer Prime With Windows Tool

Shortly after the market launch of the Asus Transformer Prime has managed the development community to rooten the tablet next, will gives you the way for make numerous modifications on your asus transformer prime. After this morning by only a somewhat complicated instructions on AndroidPolice had appeared, was a member of the xda-developers now published a handy Windows utility. This allows even inexperienced owner of Transformer Prime achieve with just one click to have root access. below i will give the more detailed guide on how to root Asus transformer prime with one click tool

tutorial root asus transformer prime

What many ordinary consumer might sound like useless gadgets is indeed an important step to unlock additional features. Since the user with root privileges has full access to the file system of Android, for example, far-reaching changes to the design are made. A backup of the complete system, the removal of pre-installed apps, the simple making of screenshots or installing custom ROMs are possible.

Read First
As always, the root process occurs naturally at their own risk and neither the developer nor tutorialfor-android.blogspot.com do not responsible for any damage to the device.


Root Asus Transformer With One Click Tool
asus transformer prime root tool windows

To root the Asus Transformer Prime, the steps that are needed is:

  1. Download the. Zip file here and unpack it on your computer.
  2. Complete the Transformer Prime on to your PC and install all the drivers that are in the. Zip file.
  3. Start the viperMOD Tool.exe primers and select the appropriate option.
If you would like the Asus Transformer Prime to have the root acces So for the first time, you just need to type the number 1 and press Enter. This automatically starts the root process, and you need do nothing further. If you want to remove the root access again, you just have to repeat the steps listed above, and then press the 2.

Ok thats it, i hope this tutorial about how to root asus transformer prime will help you to gain acces to your device, and will let you customize your device.
Read More..
 
Phone News - Powered By Blogger